
How to Plan Plumbing Penetrations Through a Tiled Shower Ceiling in Columbus, OH
- October 15, 2026
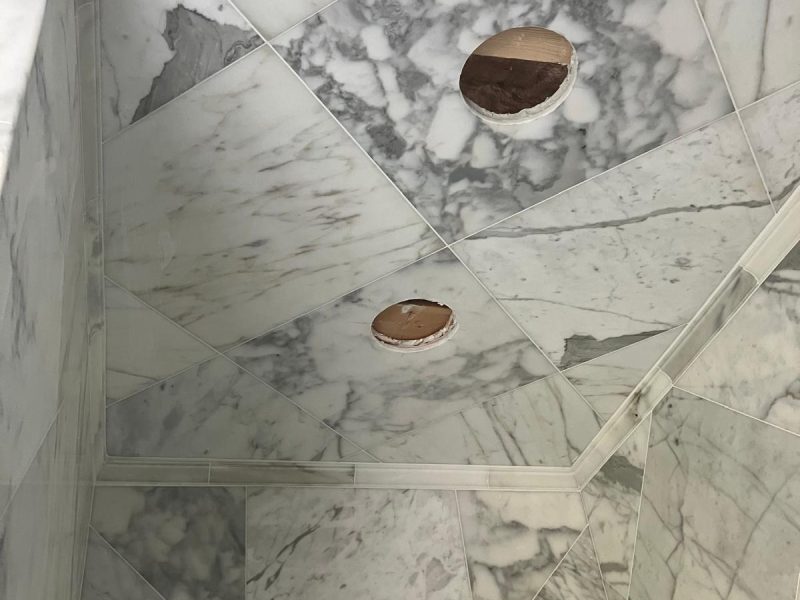
A tiled shower ceiling is one of the most refined finishes a custom shower can have — and one of the most demanding to execute correctly. When the tile is a natural stone like marble or Arabescato, the ceiling becomes a focal point that draws the eye upward and makes the shower feel like a fully enclosed, architecturally considered space. When that ceiling also has to accommodate plumbing penetrations for a ceiling-mount rainhead, recessed lighting housings, or an overhead body spray, the coordination between the plumber and tile installer becomes critical.
At Beltran Tiles LLC, we install tiled shower ceilings throughout Columbus, OH as part of full custom shower builds that include the plumbing work. Penetrations through a tiled ceiling that are not planned in relation to the tile layout are visible from the moment the trim goes on — and there is no correcting them without removing tile. Getting them right requires planning before any pipe is run or any tile is set.
What Types of Penetrations a Shower Ceiling Typically Requires
In a fully tiled custom shower with an overhead fixture package, the ceiling may need to accommodate several different types of penetrations:
Ceiling-mount rainhead supply arm A ceiling-mount rainhead connects to a supply arm that comes through the ceiling from above. The arm exits the ceiling at the center of the rainhead location and is the most visually prominent penetration in the ceiling — the trim plate and rainhead fixture hang directly from it. Its position relative to the tile layout is the most important penetration decision in the ceiling.
Recessed lighting housings Wet-rated recessed lights installed in a tiled shower ceiling require a housing that penetrates the ceiling framing and a trim ring that seats against the finished tile surface. The housing size determines the minimum hole diameter in the tile, and the trim ring diameter determines how much of the tile surface it covers. A trim ring that sits centered on a tile reads as intentional; one that bisects a grout joint or lands near a tile edge reads as unplanned.
Exhaust fan or combination light/fan Some shower ceiling designs incorporate a wet-rated exhaust fan or combination unit. These require a larger ceiling penetration than a recessed light and need to be coordinated with both the tile layout and the ductwork routing above the ceiling.
Overhead body spray or rain bar A ceiling-mount rain bar or overhead body spray panel connects to supply lines that run through the ceiling framing. Depending on the fixture, one or more supply penetrations exit the ceiling within the fixture’s mounting footprint.
Why Penetration Position Has to Be Planned Around the Tile Layout
On a flat wall, a supply stub-out that is slightly off-center is covered by a trim plate and largely invisible. On a tiled ceiling, every penetration is viewed from directly below at close range, under lighting that makes grout joints, tile edges, and trim positions clearly visible.
A ceiling-mount rainhead arm that exits the ceiling in the center of a tile — rather than at the intersection of four tiles or at a grout joint — requires that one tile be cut with a round hole in its face. That cut is visible around the perimeter of the trim plate if the plate does not fully cover it, and even when it is covered, the position of the plate relative to the surrounding tile joints telegraphs whether the penetration was planned or improvised.
For recessed lights, the relationship between the light trim ring and the tile layout is equally visible. A 4-inch trim ring centered on a 12-inch tile sits symmetrically within the tile and reads as designed. The same trim ring positioned near the corner of a tile, overlapping two or three tiles at once, reads as an afterthought regardless of how cleanly the tile is cut around it.
The only way to control these relationships is to establish the tile layout first — or simultaneously with the rough-in — so that penetration positions can be set to land where the tile layout calls for them, rather than where a standard measurement places them.
How to Coordinate Penetration Placement With the Tile Layout
Step 1: Establish the tile layout on the ceiling before rough-in is finalized
The ceiling tile layout starts from a center point, just as a floor layout does. From that center point, tile courses radiate outward toward the perimeter. Whether the tile is set square to the walls or on a diagonal — as in a 45-degree diamond pattern — the center point and the resulting grout joint locations are determined before any penetration is positioned.
For a diagonal layout, the grout joint intersections fall at different positions than they would in a square layout, and the center point of each tile falls at a different location. A penetration planned for a square layout and then executed in a diagonal layout will almost never land where it was intended relative to the tile.
Step 2: Mark the intended penetration positions on the ceiling framing
Once the tile layout is established and the positions of tile centers and grout joint intersections are known, the intended penetration positions are marked on the ceiling framing. For a ceiling rainhead, the ideal position is the intersection of four tile corners — a grout joint crossing — so that the supply arm exits at a point equidistant from the corners of four tiles and the trim plate sits symmetrically over all four. For recessed lights, the center of each light is marked at the center of the tile it is intended to land in.
Step 3: Adjust rough-in to match the layout marks
With penetration positions marked, the plumber adjusts supply line routing so that the supply arm exits at the marked location. For recessed lights, the housing is positioned so that the center of the light opening aligns with the ceiling mark. Small adjustments at this stage — shifting a supply elbow an inch or two in any direction — cost almost nothing and eliminate the need for compromises at the tile stage.
Step 4: Confirm clearances above the ceiling
Before finalizing penetration positions, the space above the shower ceiling is checked for conflicts: joists, blocking, existing ductwork, electrical runs, and any other trade work that occupies the same framing bays. A supply arm that needs to run through a joist bay without obstruction may need to enter from a different direction than planned, which affects where it can exit through the ceiling. Identifying these conflicts before rough-in is complete prevents last-minute position changes after the tile layout has been committed.
Cutting Tile for Ceiling Penetrations
Once the ceiling tile is set and the penetration locations are confirmed, holes are cut through the tile for each penetration. On a marble or natural stone ceiling, cutting circular holes requires a diamond-tipped hole saw appropriate for the tile material and thickness. The cut is made from the finished face of the tile to prevent chipping at the surface edge.
For each penetration, the hole diameter is sized to the trim or housing that will cover it — not to the pipe or housing body itself. The trim plate, light ring, or fixture escutcheon needs to sit flat against the tile surface and fully cover the cut edge. If the hole is slightly oversized for the pipe but fully covered by the trim, it reads as clean. A hole that is slightly too large for the trim that covers it exposes the cut edge and mortar bed beneath.
Cuts are dry-fit before the tile is permanently set whenever possible — confirming that the fixture trim seats correctly against the tile surface before the mortar cures eliminates the risk of discovering a fit problem after the tile is in place.
Special Considerations for Natural Stone Shower Ceilings
A marble or natural stone shower ceiling introduces additional handling requirements beyond what a porcelain or ceramic ceiling would require.
Full mortar coverage is non-negotiable overhead. Tile installed on a ceiling must have complete mortar coverage with no voids — a hollow spot behind a ceiling tile is a structural failure waiting to happen, not just a cosmetic problem. Every tile is back-buttered and set with a large-format mortar rated for overhead installation.
Veining orientation is planned before installation begins. On a marble ceiling, the direction of veining across the tile field is visible from directly below. Tiles oriented consistently — veining running in the same direction across the full ceiling, or mirrored symmetrically from the center — look curated. Tiles oriented at random look like leftover material. This planning happens before the first tile is set, with tiles laid out dry on the floor in their intended ceiling positions and adjusted until the veining reads correctly.
Weight is a factor in adhesive selection. Natural stone is heavier than porcelain or ceramic of the same dimensions. The mortar and any supplemental adhesive used for ceiling installation must be rated for the weight of the specific tile being installed overhead.
Tiled Shower Ceiling Installation in Columbus, OH
At Beltran Tiles LLC, we plan and install tiled shower ceilings — including coordination of all plumbing penetrations — for custom shower builds throughout Columbus, OH and the surrounding areas. We handle both the plumbing rough-in and the tile installation, which means penetration positions are set to work with the tile layout before any pipe is fixed or any tile is cut.
Ready to build a custom tiled shower in Columbus, OH? Contact Beltran Tiles LLC today for a free consultation and estimate.
Share it :
Transform your home with expert craftsmanship
Upgrade your space with high-quality residential remodeling services in Columbus, OH. From tile installation to complete home improvements, Beltran Tiles LLC delivers precision, durability, and results you can trust.

Beltran Tiles LLC provides reliable residential remodeling services in Columbus, OH and surrounding areas. With over 23 years of experience, we deliver quality craftsmanship you can trust.
Contact
- Columbus, OH
- 40 Miles Of Coverage
- davidbeltran614@gmail.com
- info@beltrantiles.com
- (614) 517-6763
Info
- Monday to Saturday 8:00 AM - 6:00 PM
- By appointment only
- 24/7 Emergency Service
- +23 Years of Experience
- Residential Services Only
- Licensed & Insured
- Cash, Check & Zelle
- English and Spanish spoken